Manage Order Details in BoxNCase Admin
In this guide, you’ll learn how to navigate and manage comprehensive order information in BoxNCase Admin. Order details provide a complete view of order status, customer information, timeline, payments, and fulfillments.Open Order’s Details
To open an order’s details:- Go to Orders from the sidebar.
- Select one of the orders to open its details page.
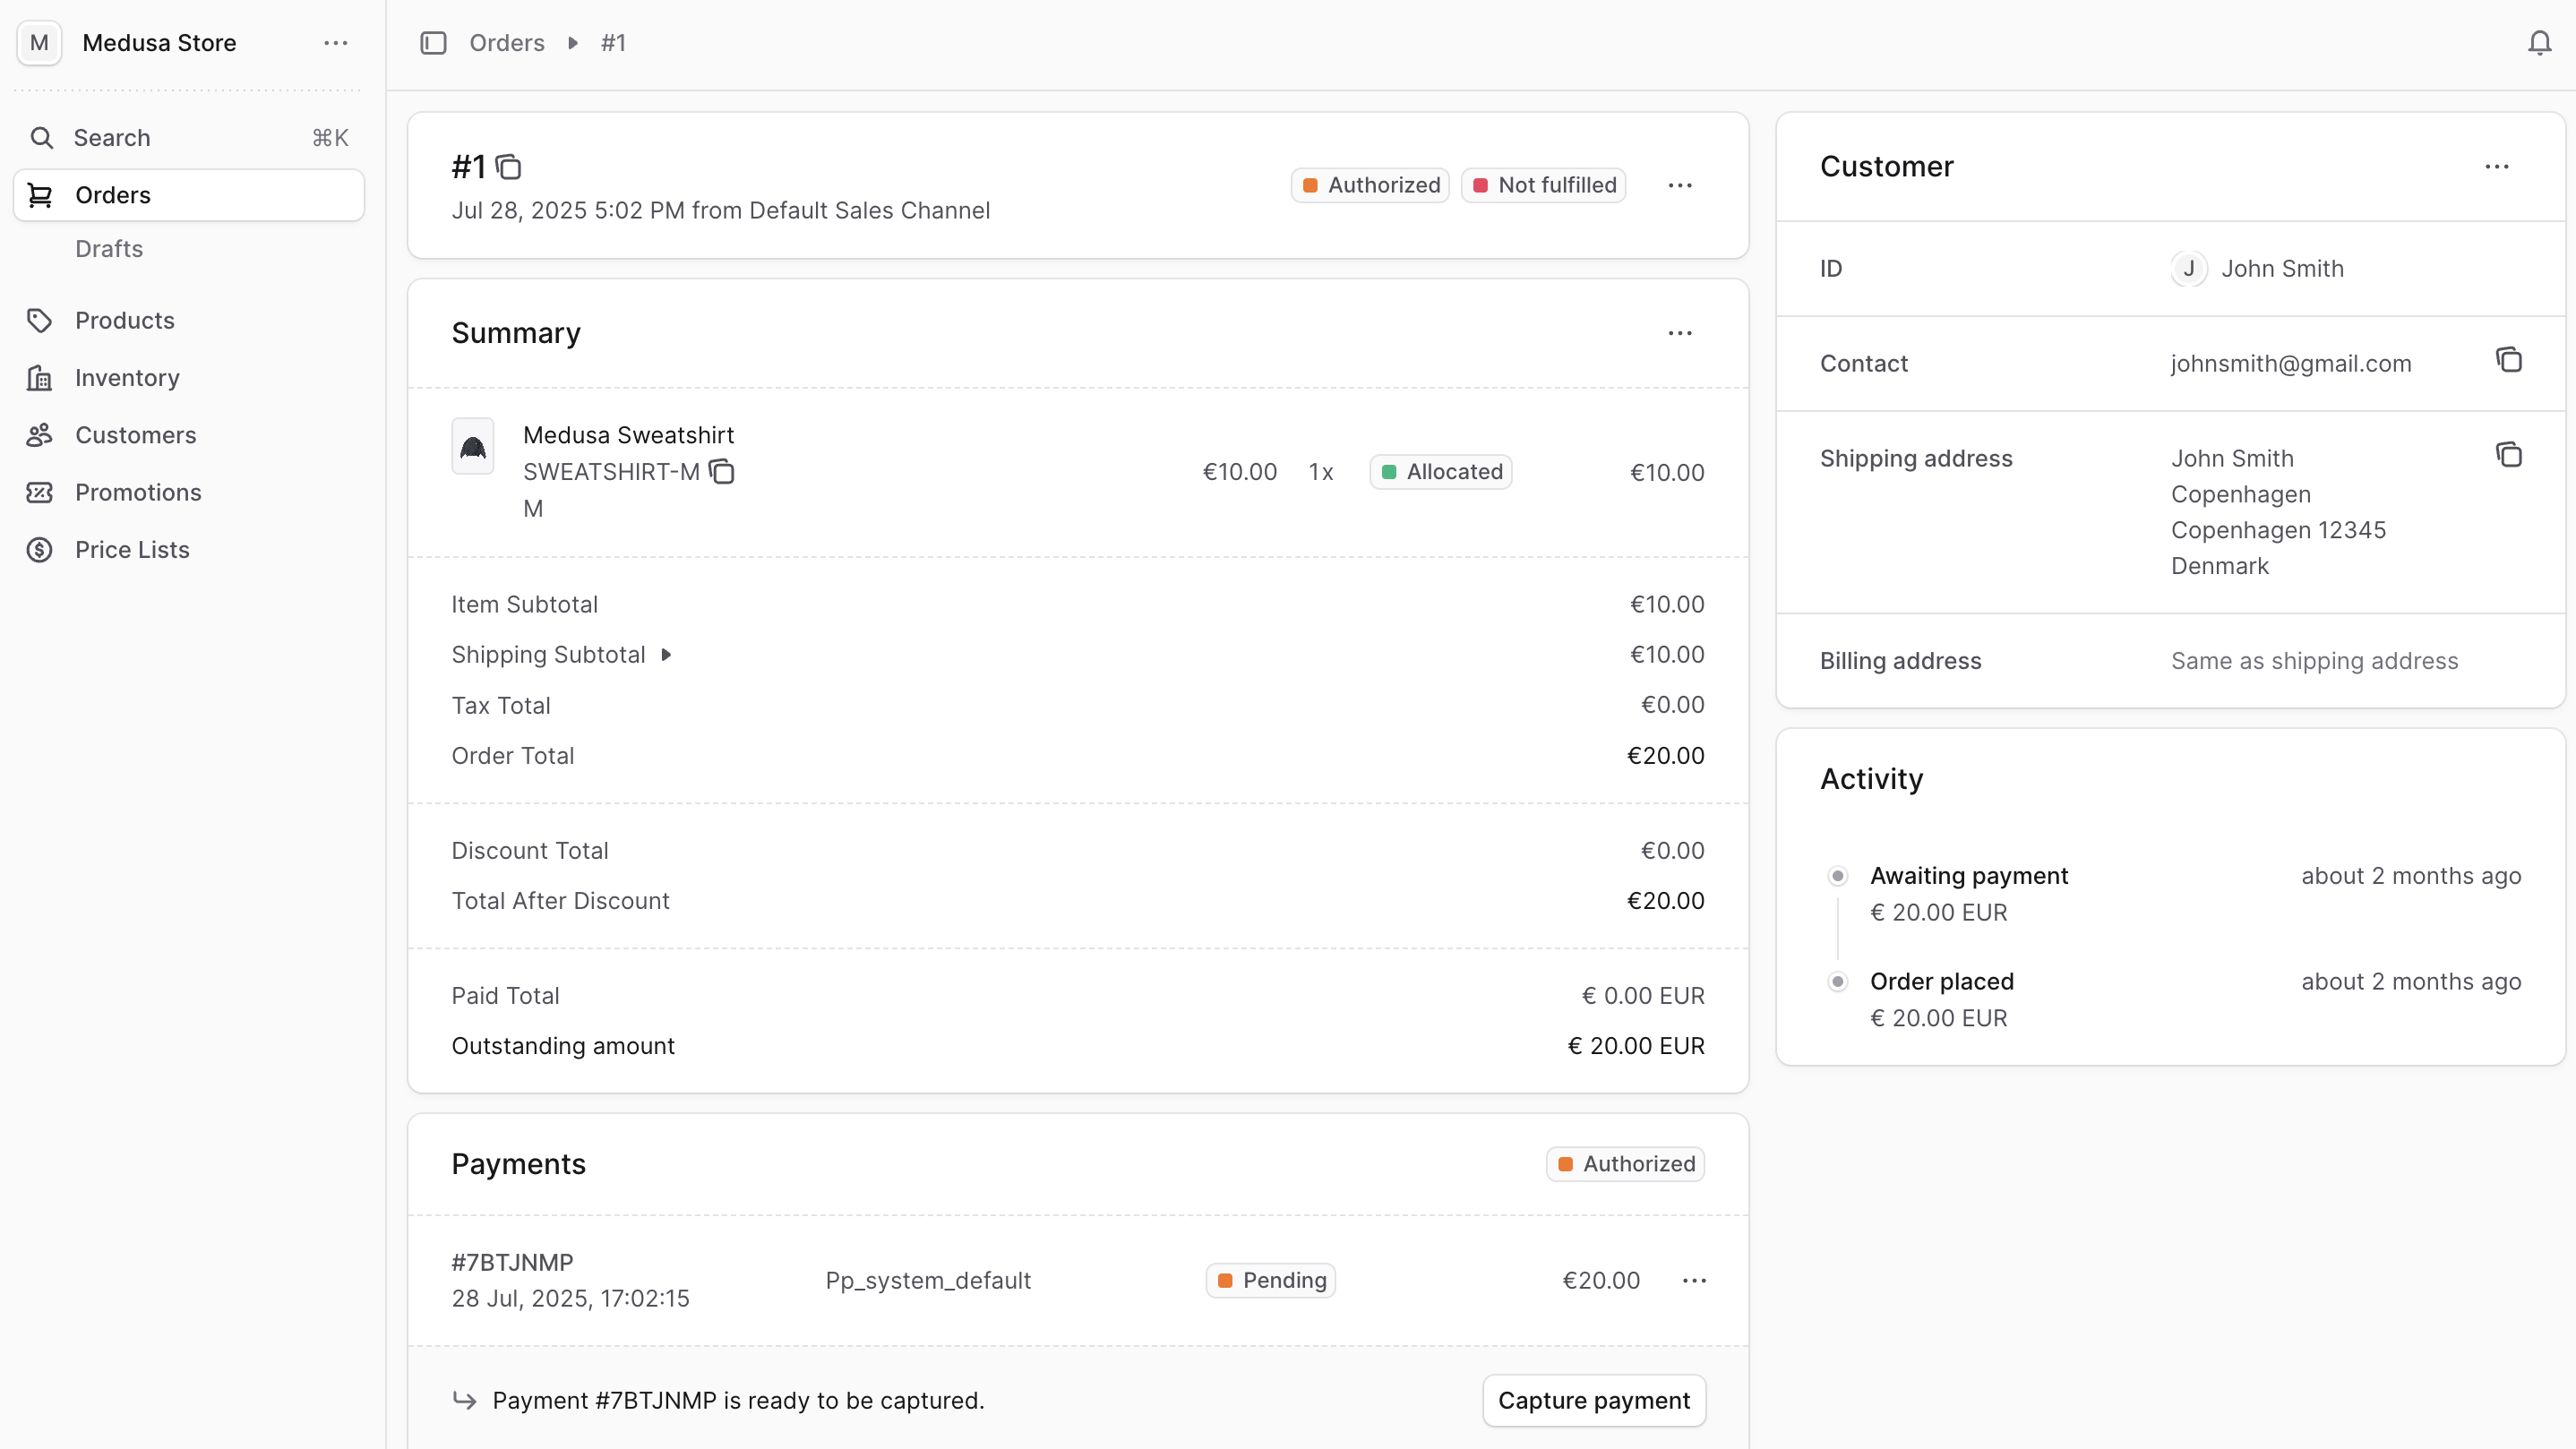
Order Summary Section
The Summary section includes the summary of the items the customer purchased as well as totals related to taxes, shipping, and more. Use this section to get a quick overview of the order, create returns, create exchanges, or manage the order’s details as explained later in this guide.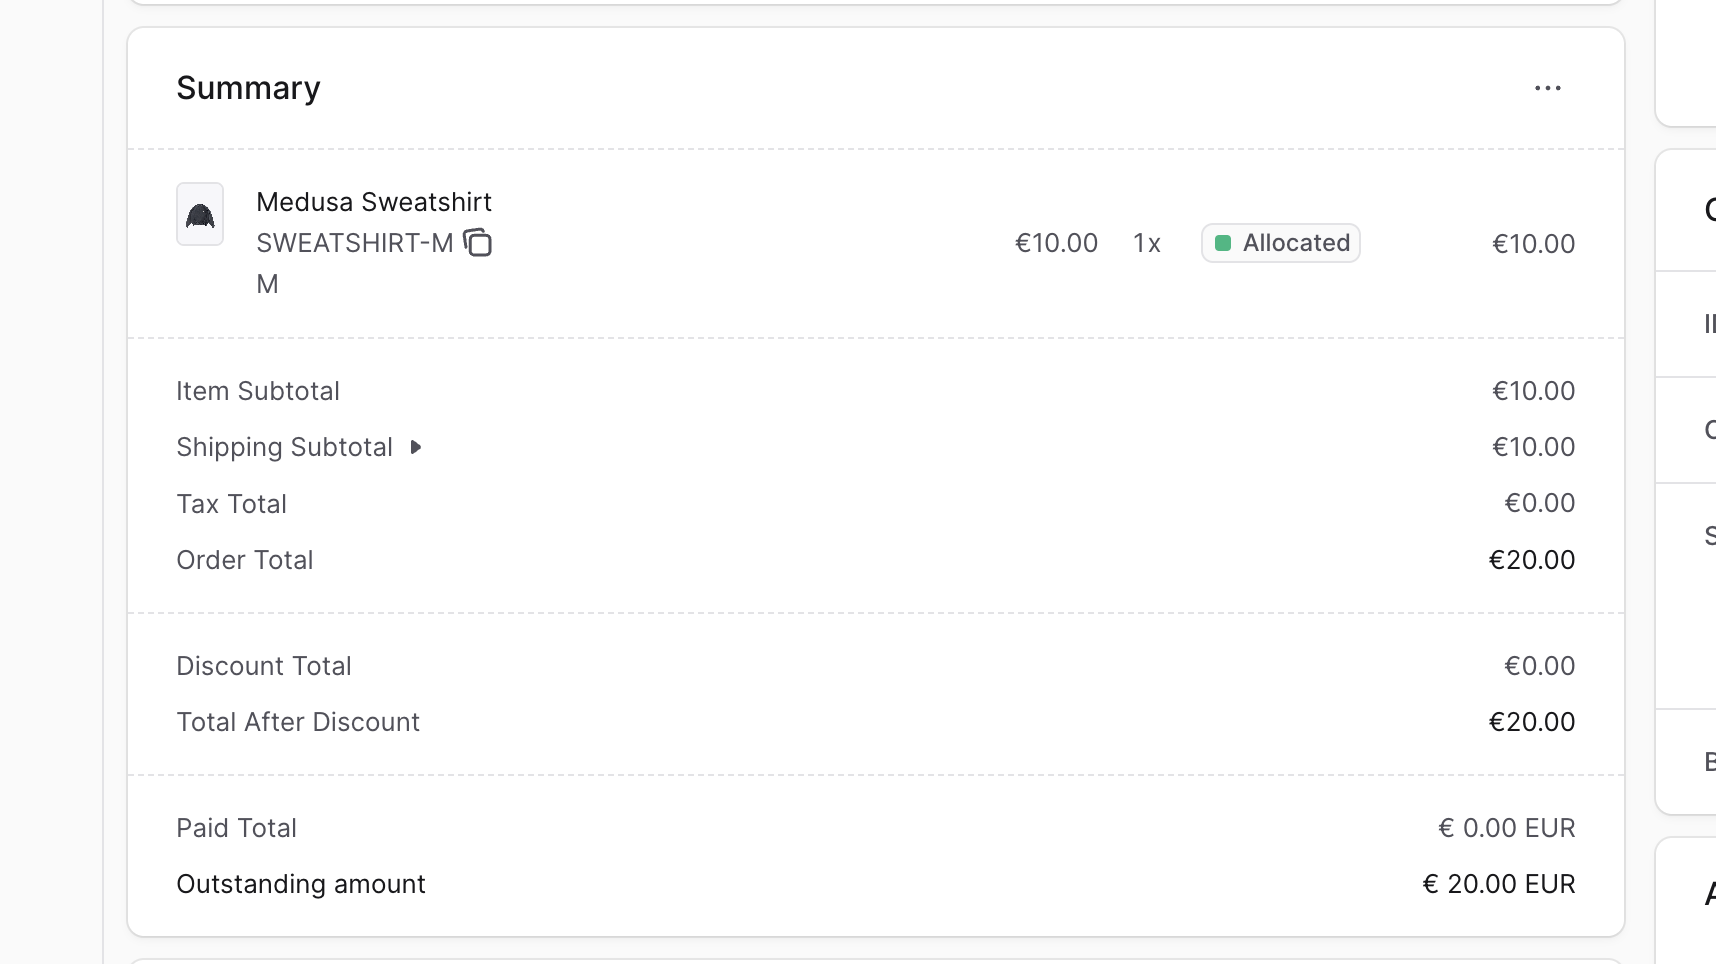
Customer Section
The Customer section includes the customer’s details, including their contact information and shipping address. Use this section to view and edit the customer’s details pertaining to the order as explained later in this guide.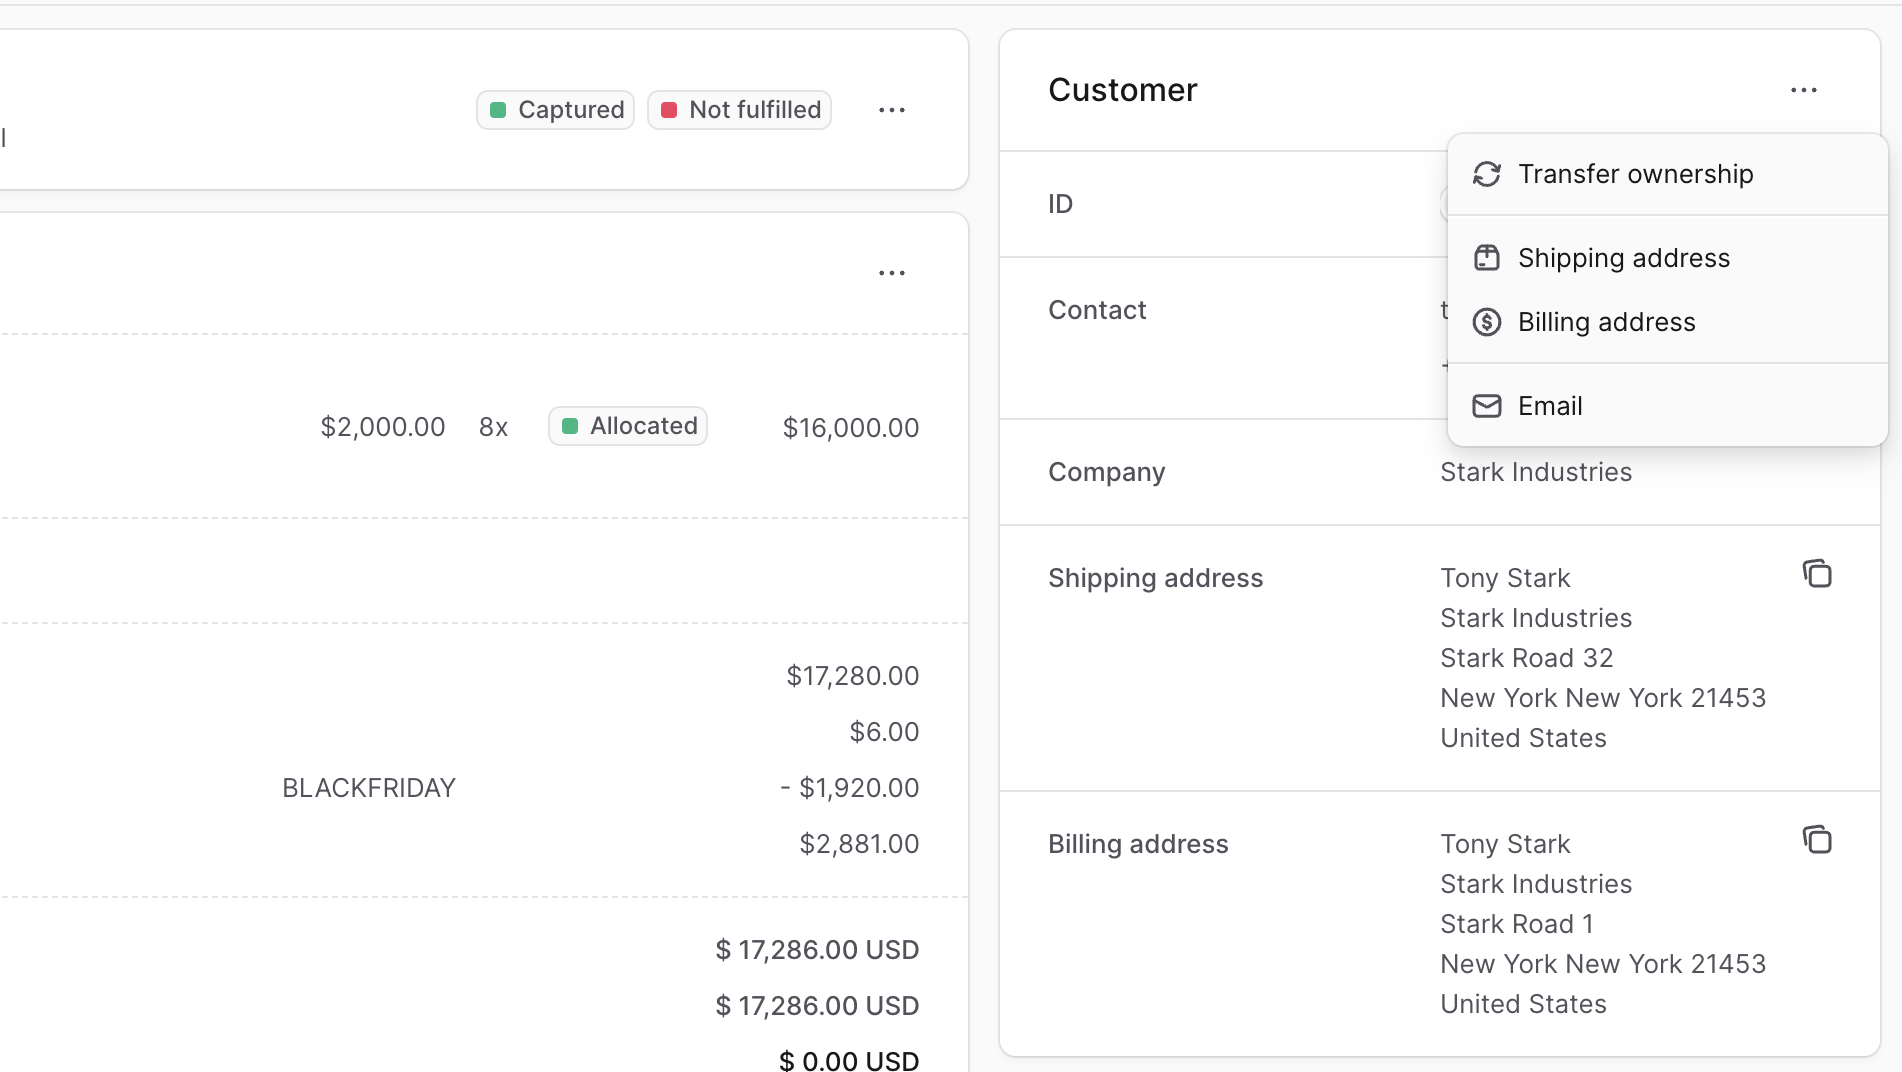
Activity Section
The Activity section of the order details page shows a summary of the changes made on the order. That includes payments captured, returned items, shipped items, and more. Use this section to get a quick overview of the order’s history and actions taken on it.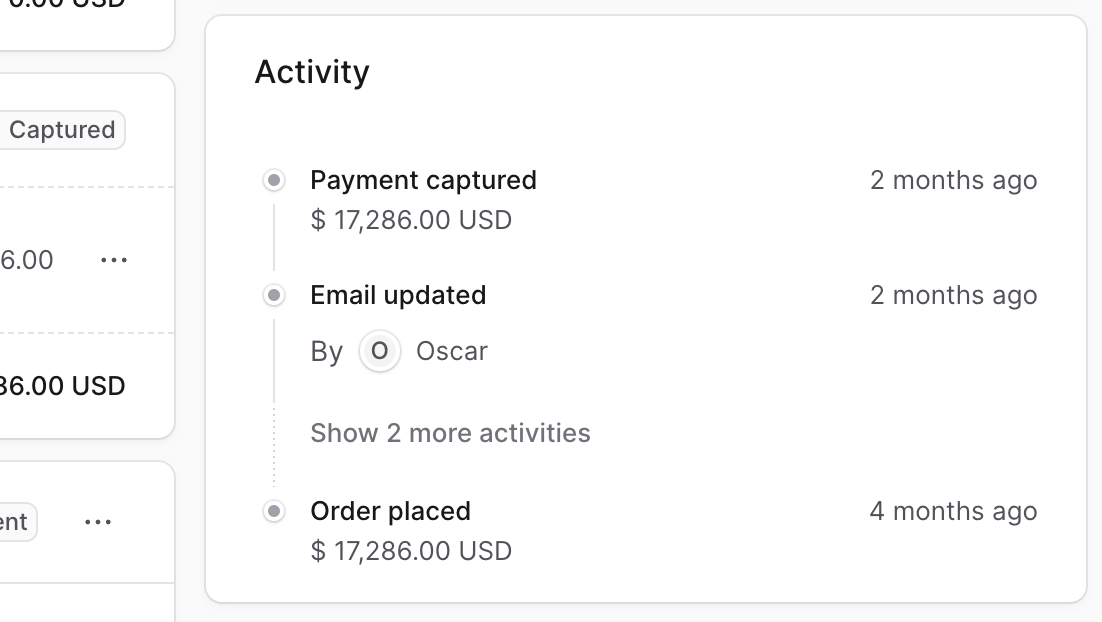
Payments Section
The Payment section of the order details page includes details related to the order’s payments, showing a full history of the changes in the payment’s status. Use this section to view and manage the payments related to the order.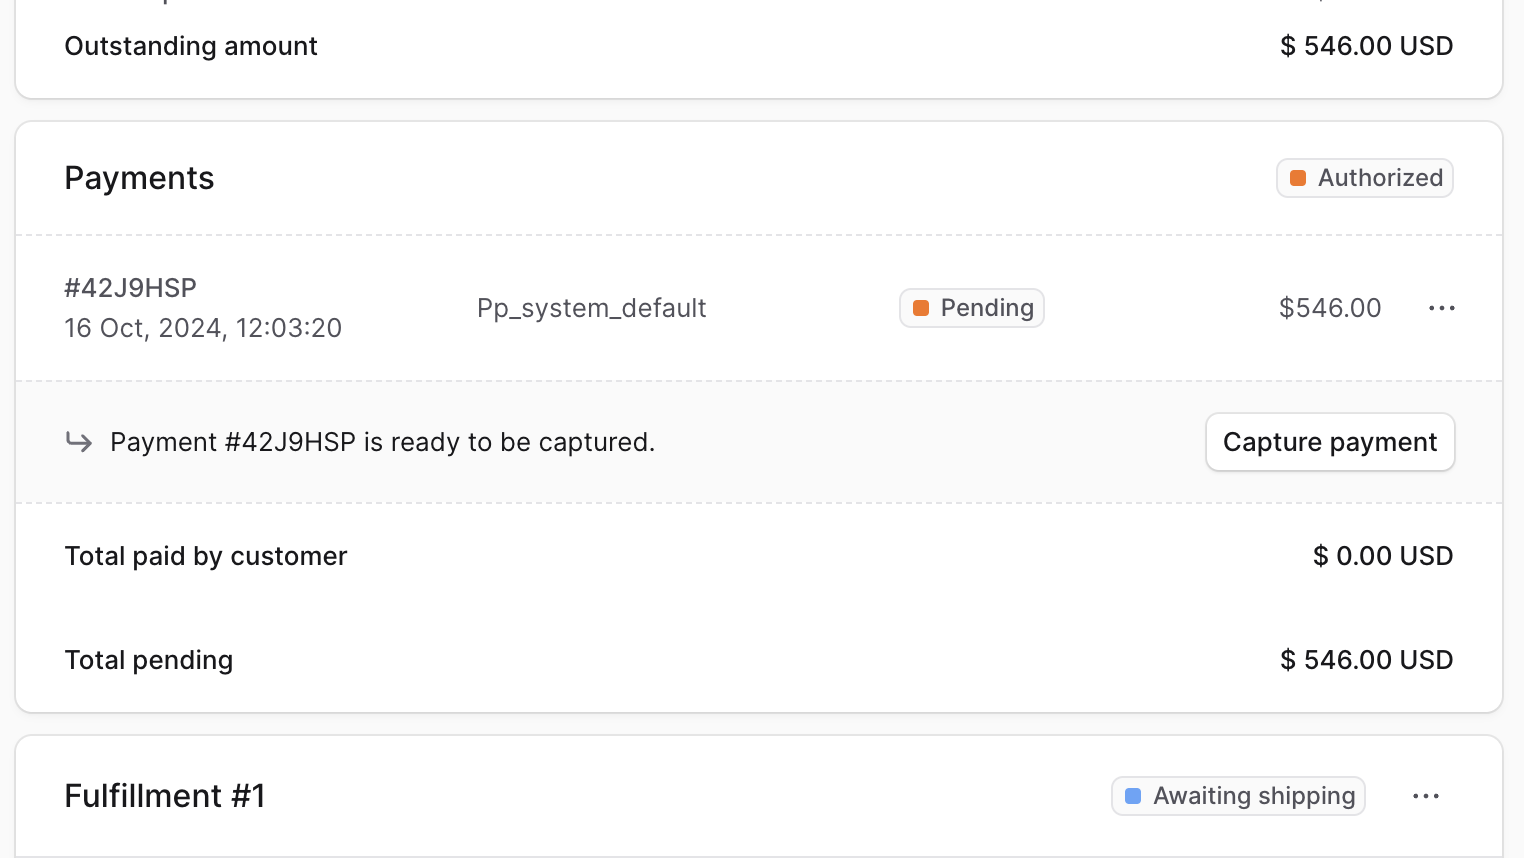
Unfulfilled Items Section
The Unfulfilled Items section of the order details page includes the details of items that haven’t been fulfilled yet. Use this section to view the items that need to be fulfilled and create their fulfillments.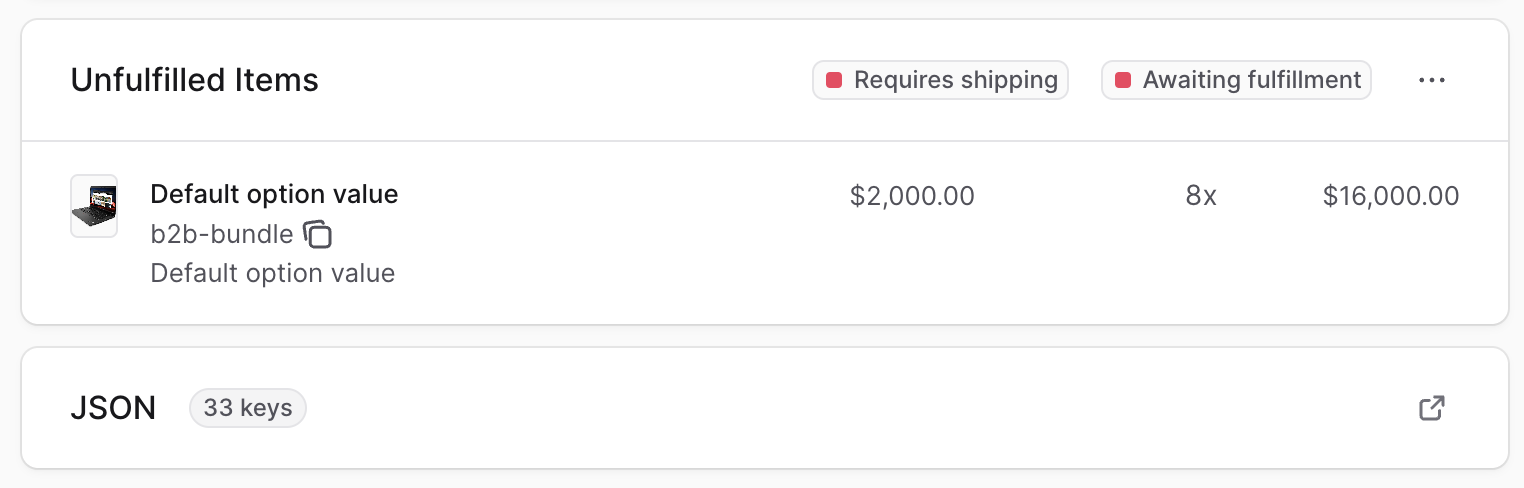
Fulfillment Sections
For every fulfillment you create, a new fulfillment section is added with its number in the title. The section includes details of the fulfillment. Use this section to view and manage the fulfillment.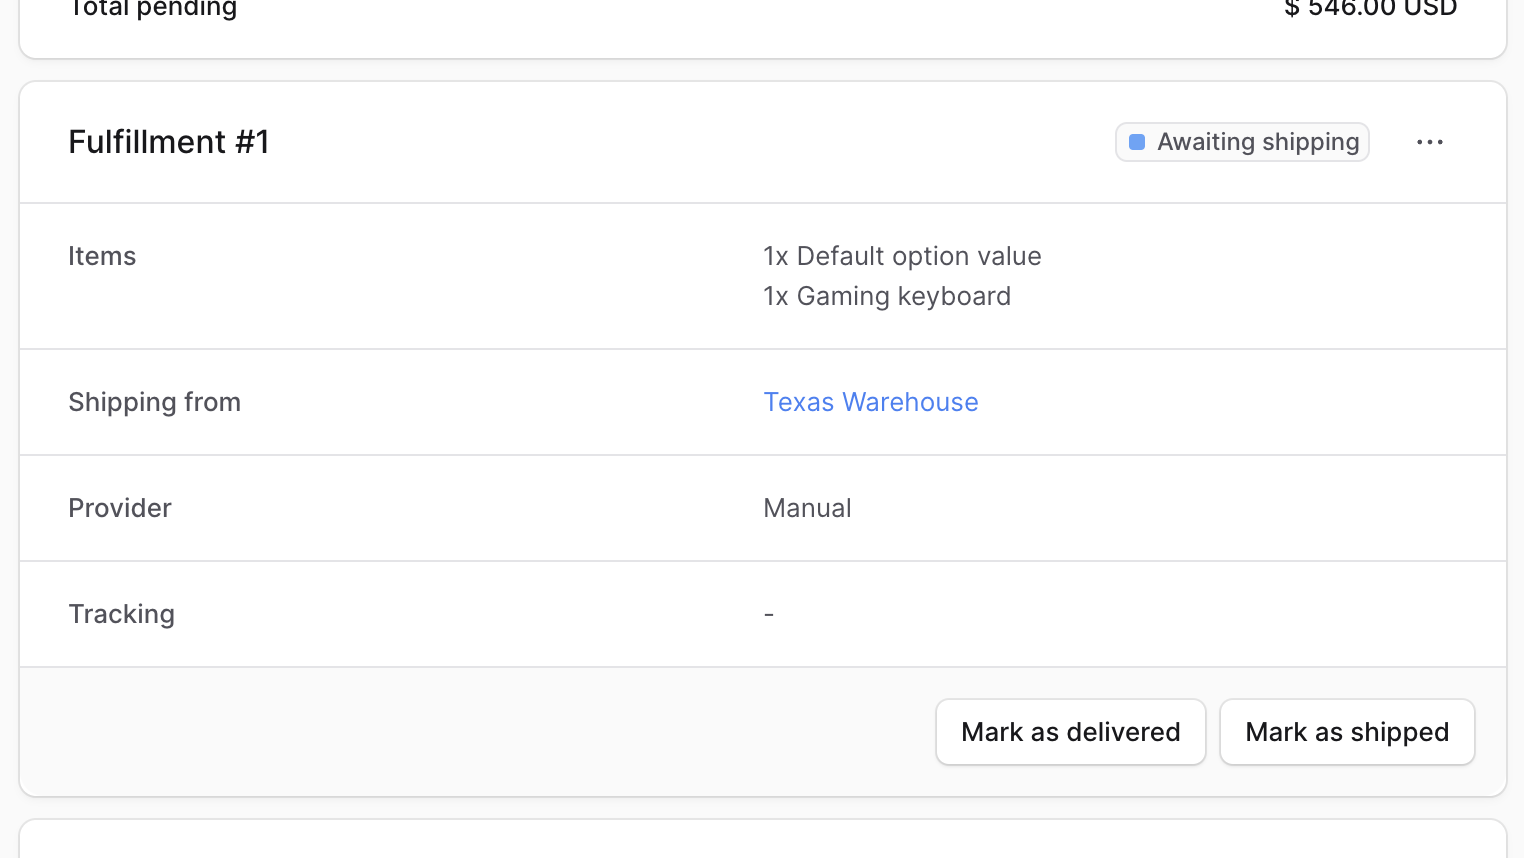
JSON Section
The JSON section is useful for developers to view the raw order data in JSON structure. Developers can use this section to debug and troubleshoot issues related to the order. To view the JSON structure, click on the ↗ icon.Allocate Order Items Manually
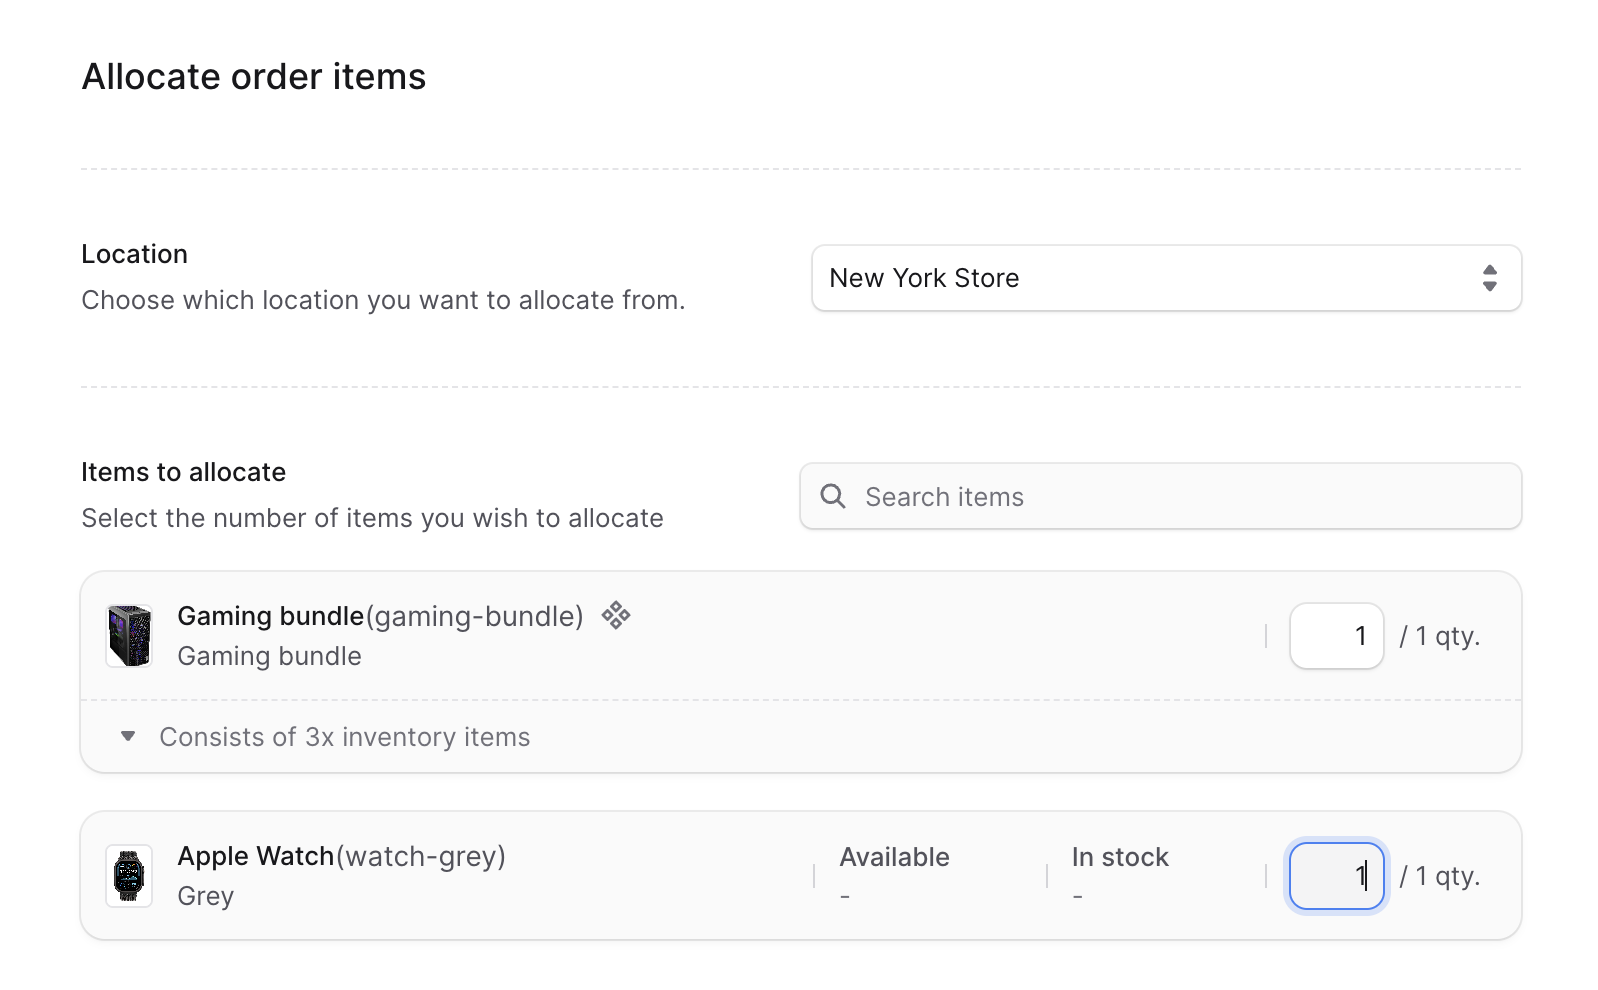
If BoxNCase manages the inventory of an ordered item, it reserves or allocates the ordered quantity from the inventory. This ensures that the item’s available quantity is reduced by the ordered quantity. BoxNCase allocates the ordered quantity from the stock location of the chosen shipping option in the order. For example, if the customer chooses a shipping option that uses a stock location in the US, BoxNCase allocates the ordered quantity from that stock location. However, in some cases you may need to allocate an item manually, such as if you edit the order or change the inventory management configurations of the item’s product variant. You’ll find next to the item’s name in the Summary section a “Not allocated” badge.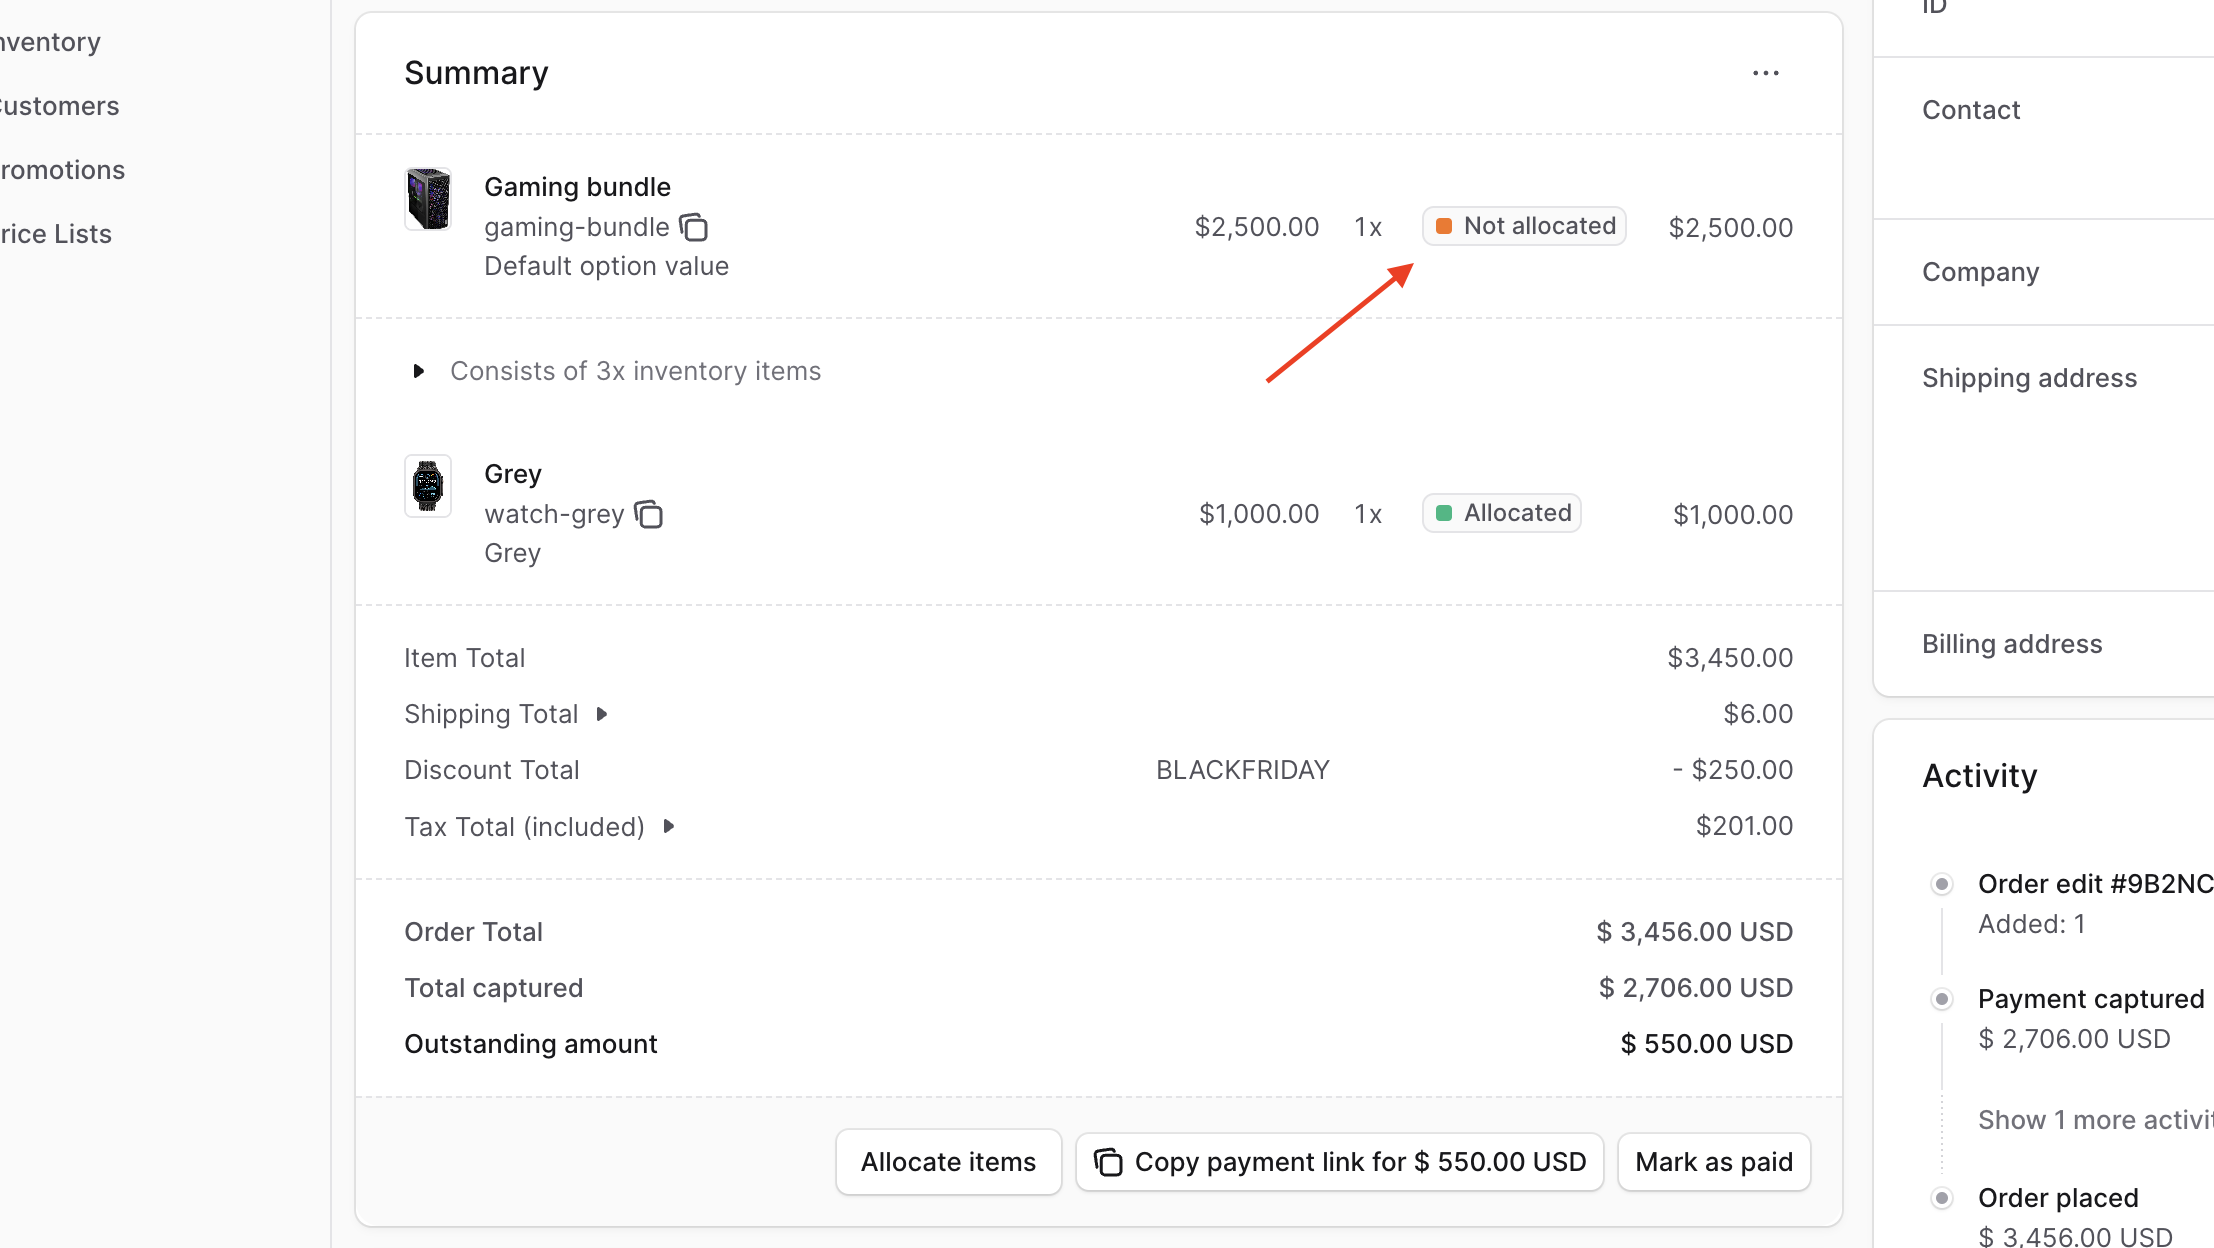 To allocate these items manually:
- Go to the Summary section of the order’s details page.
- If one or more items haven’t been allocated, you’ll find an “Allocate items” button at the bottom of the section. Click on it.
- In the form that opens:
- For the Location field, choose the location to allocate the item from.
- In the Items to Allocate section, enter the quantity to allocate for each item.
- Once you’re done, click the “Allocate Items” button.
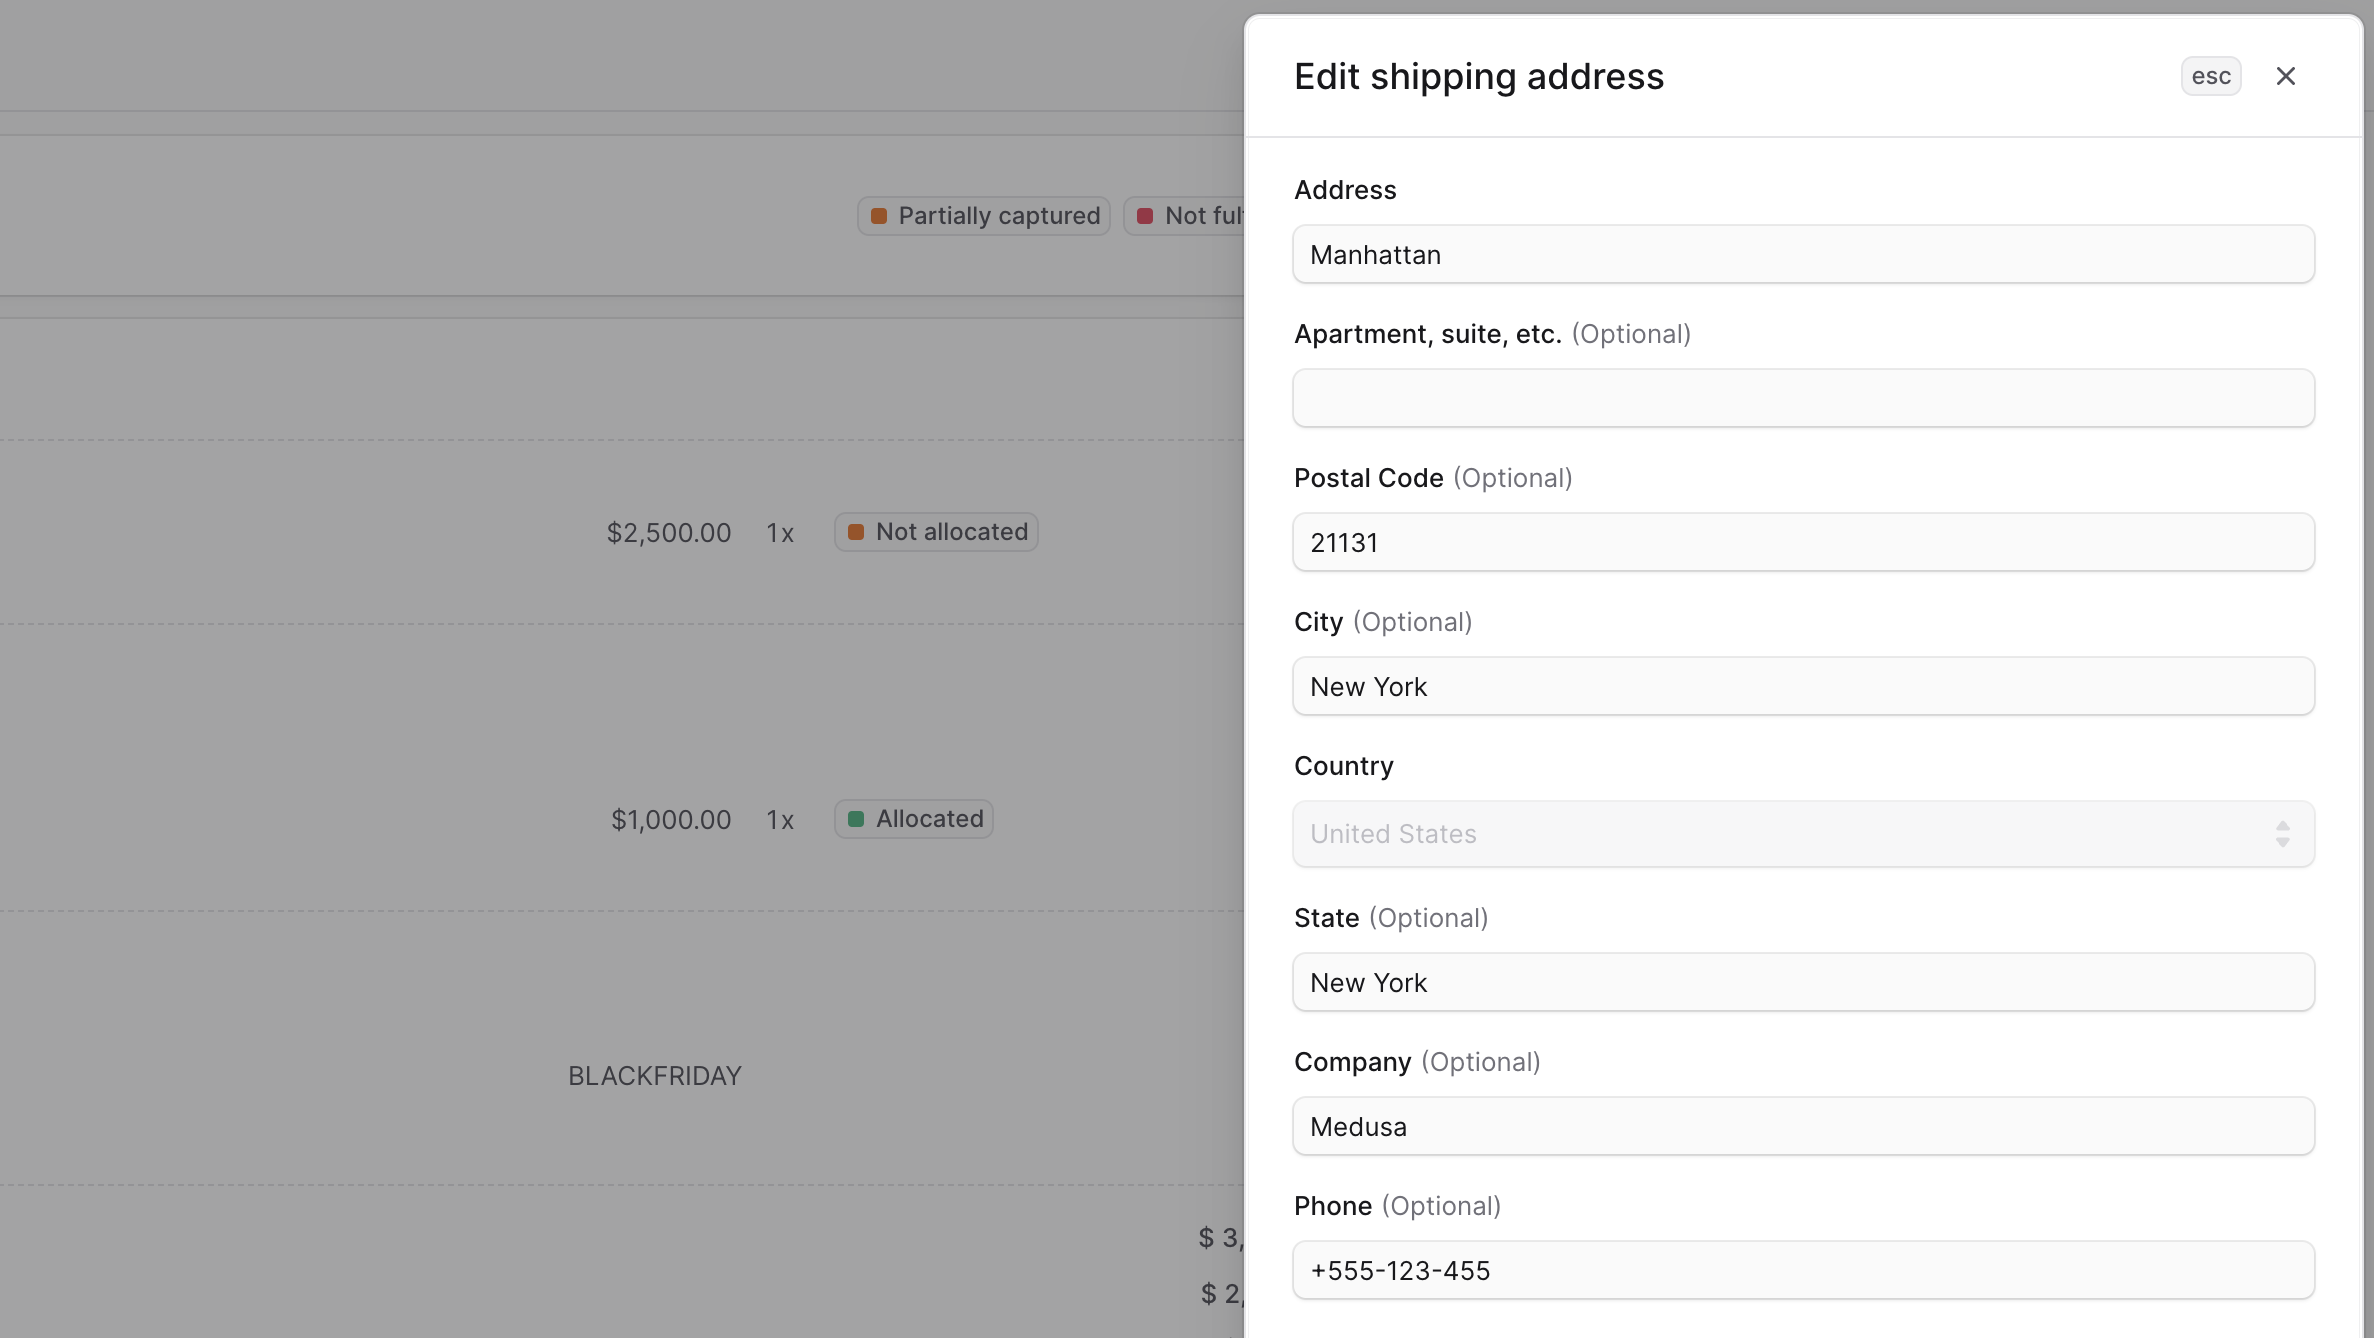
Edit the Shipping Address
To edit the shipping address used for an order:- Open the order details page.
- Click on the ⋯ icon at the top right of the Customer section.
- Click on “Shipping address” from the dropdown.
- In the side window that opens, update the address details.
- Once you’re done, click on the Save button.
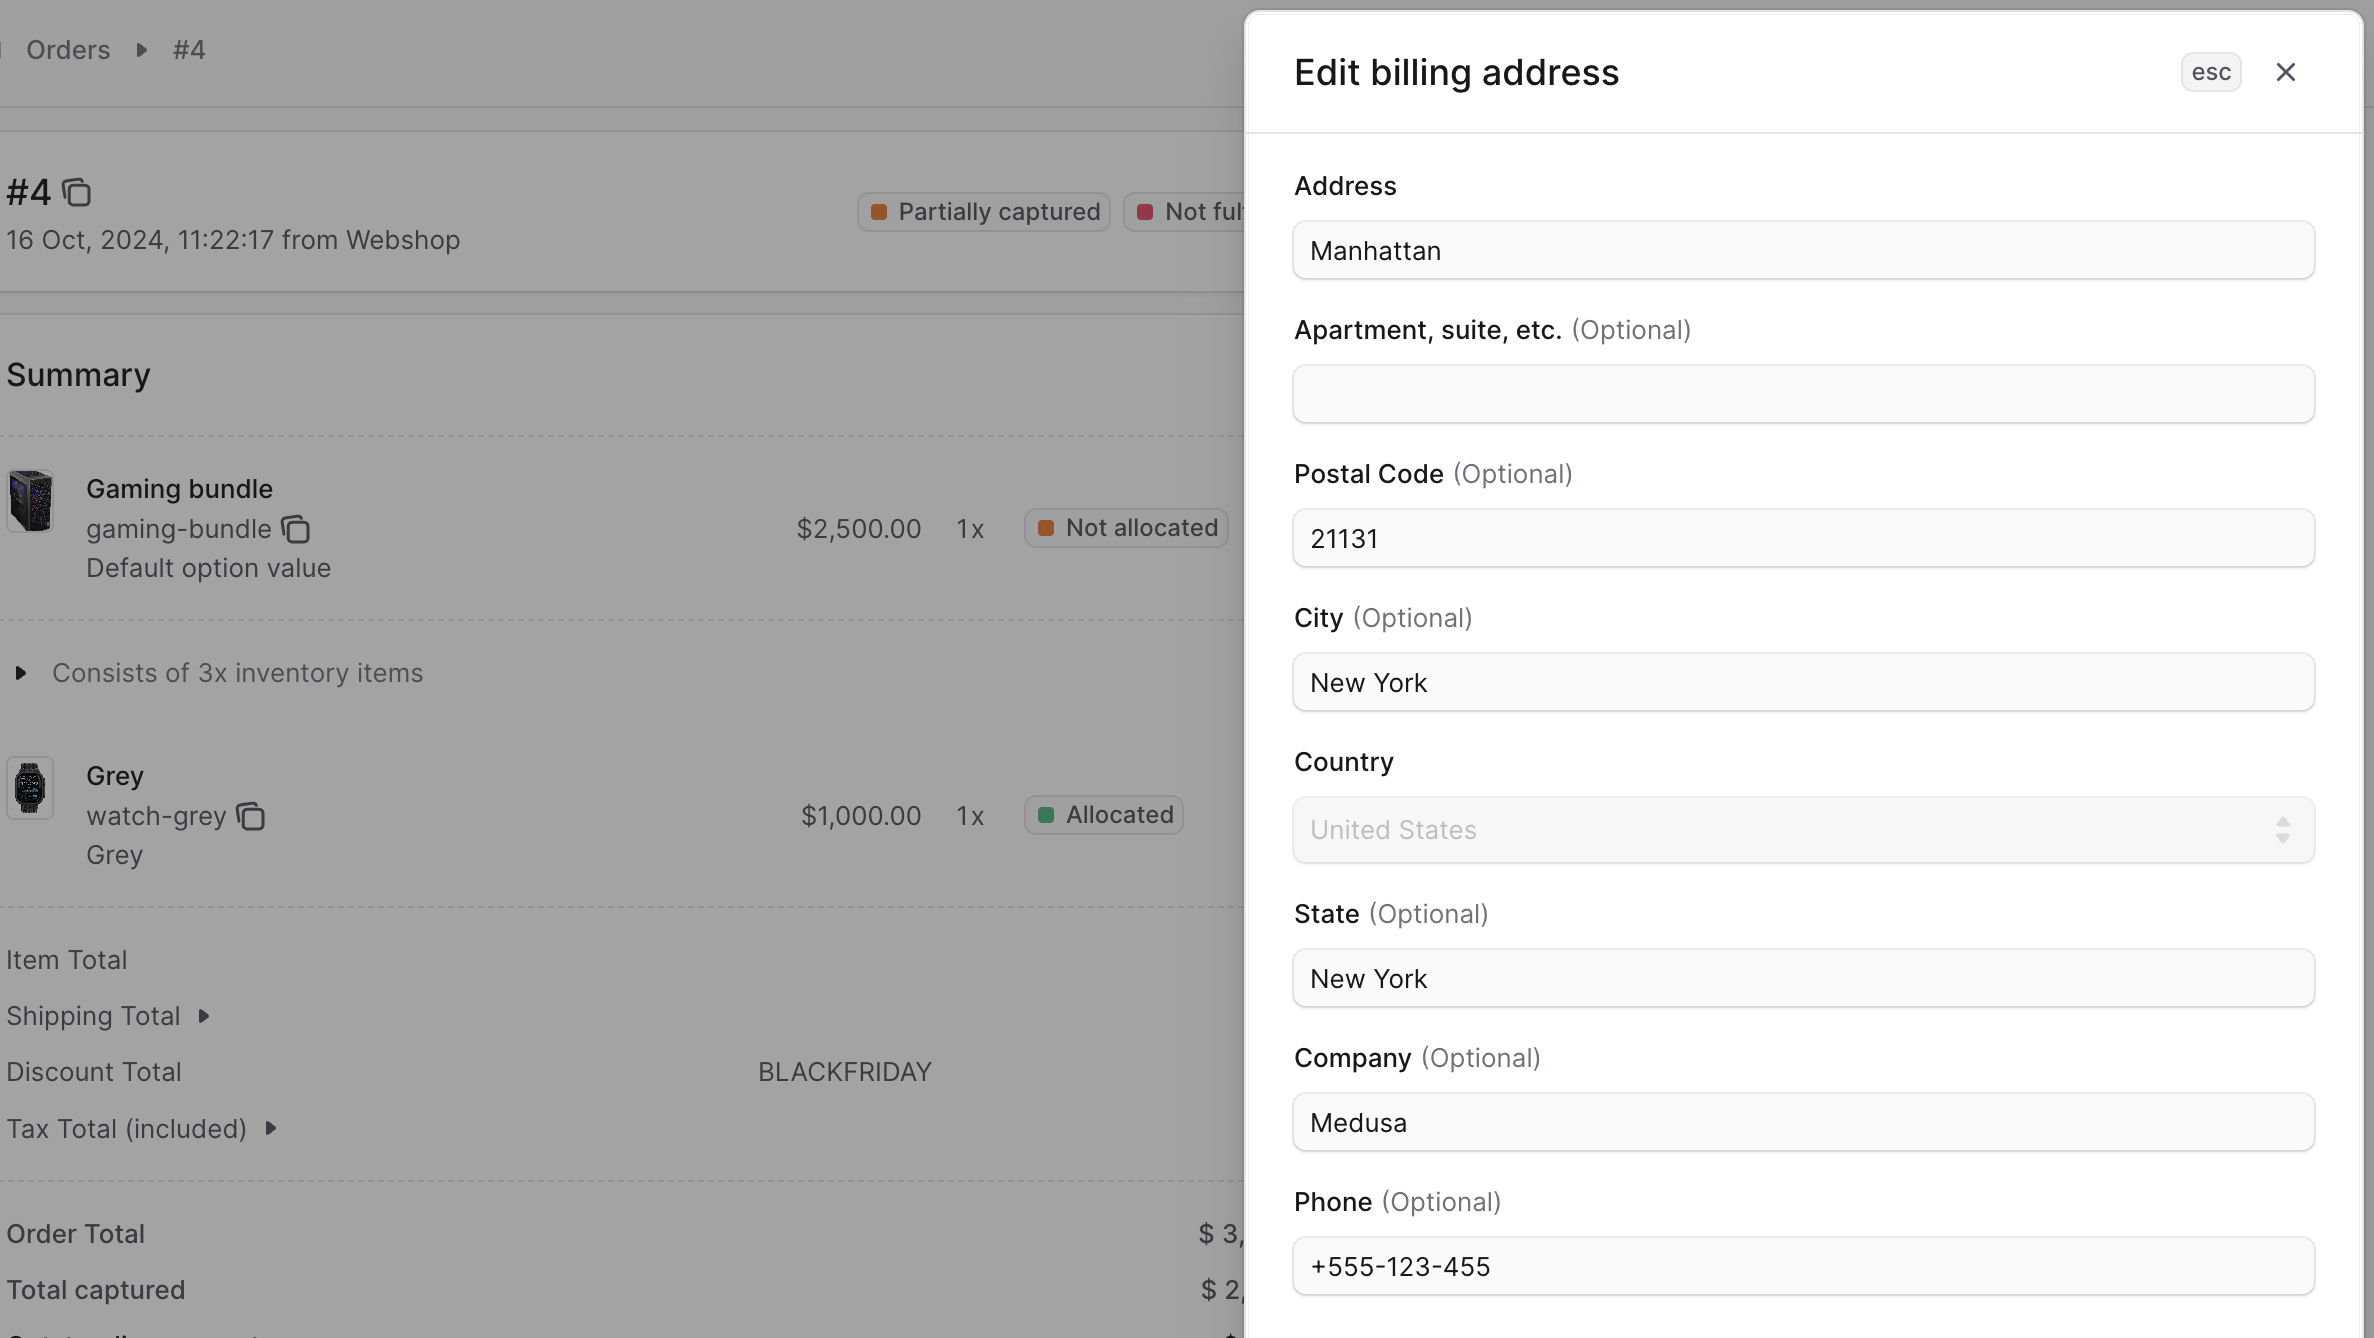
Edit the Billing Address
To edit the billing address used for an order:- Open the order details page.
- Click on the ⋯ icon at the top right of the Customer section.
- Click on “Billing address” from the dropdown.
- In the side window that opens, update the address details.
- Once you’re done, click on the Save button.
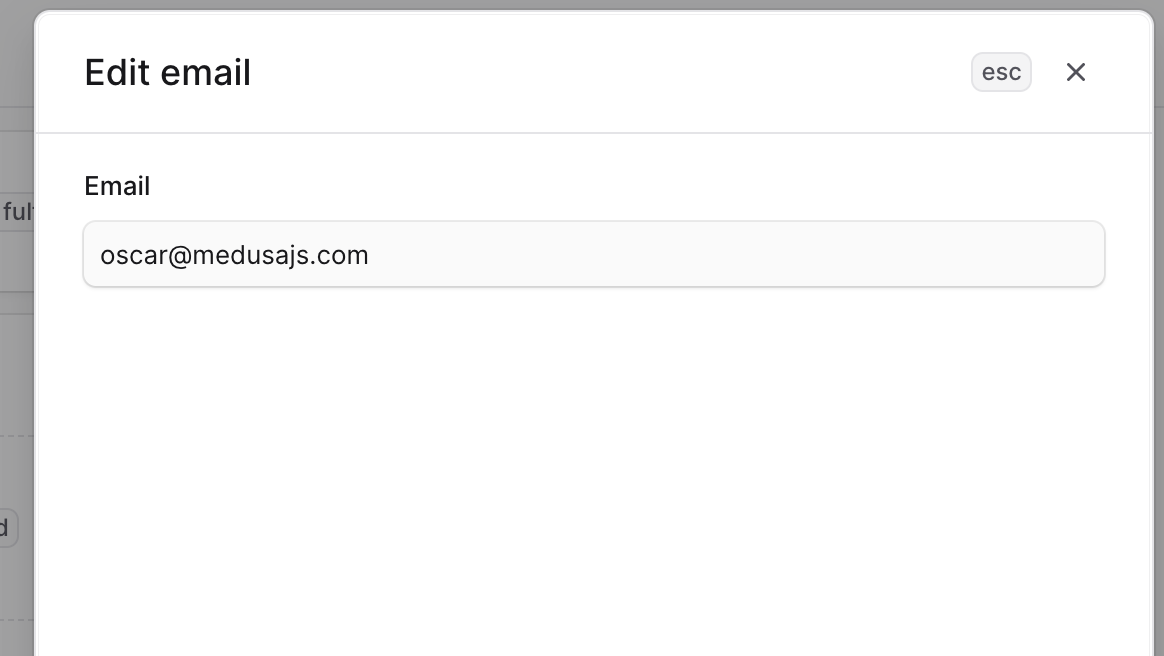
Edit Email Address
You can edit the email address of an order to send order-update notifications to a new email address. This doesn’t update the associated customer’s address or transfer the order to a new customer. To transfer the order to a new customer, see the Transfer Customer Ownership section. To edit the email address associated with an order:- Open the order details page.
- Click on the ⋯ icon at the top right of the Customer section.
- Click on “Email” from the dropdown.
- In the side window that opens, edit the email address.
- Once you’re done, click on the Save button.
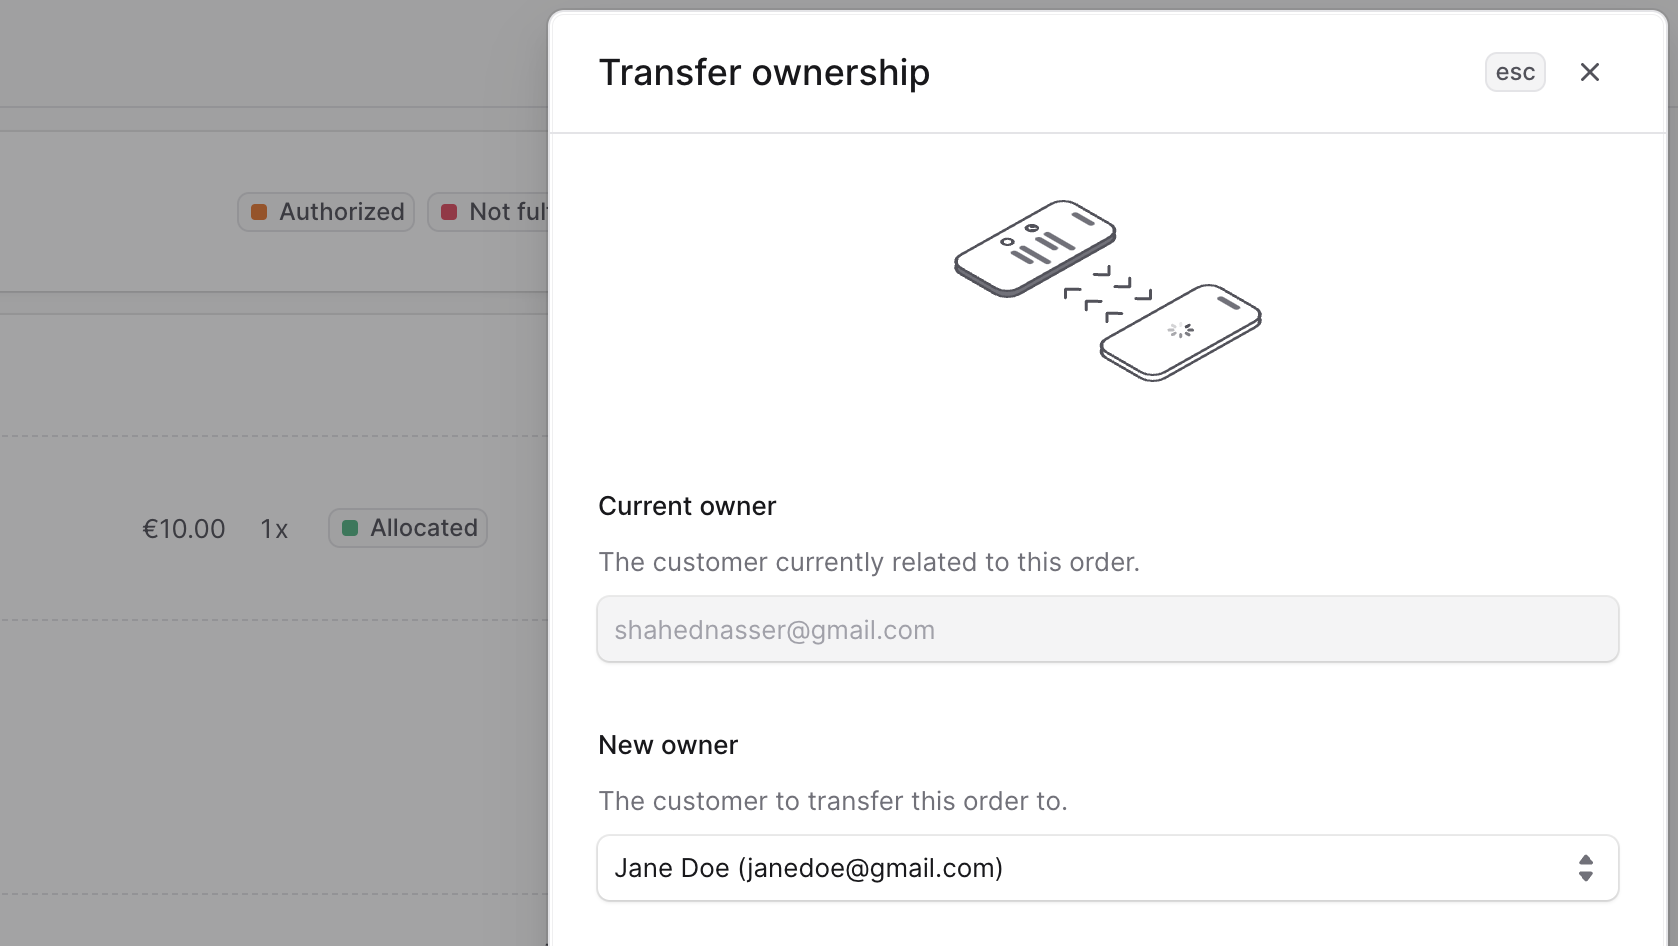
Transfer Customer Ownership
You can transfer the ownership of an order to another registered customer. This changes the customer associated with the order and sends notifications for order updates to the new customer. You can’t transfer ownership to a guest customer, and that includes customers you create through the admin dashboard. When you transfer the ownership of an order, the original customer will receive a notification, such as an email, requesting their approval for the transfer. The order is transferred to the new customer only after the original customer approves the transfer. To transfer the ownership of an order to another customer:- Open the order details page.
- Click on the ⋯ icon at the top right of the Customer section.
- Click on “Transfer ownership” from the dropdown.
- In the side window that opens, choose the new customer from the dropdown under the “New owner” section.
- Once done, click on the Save button.
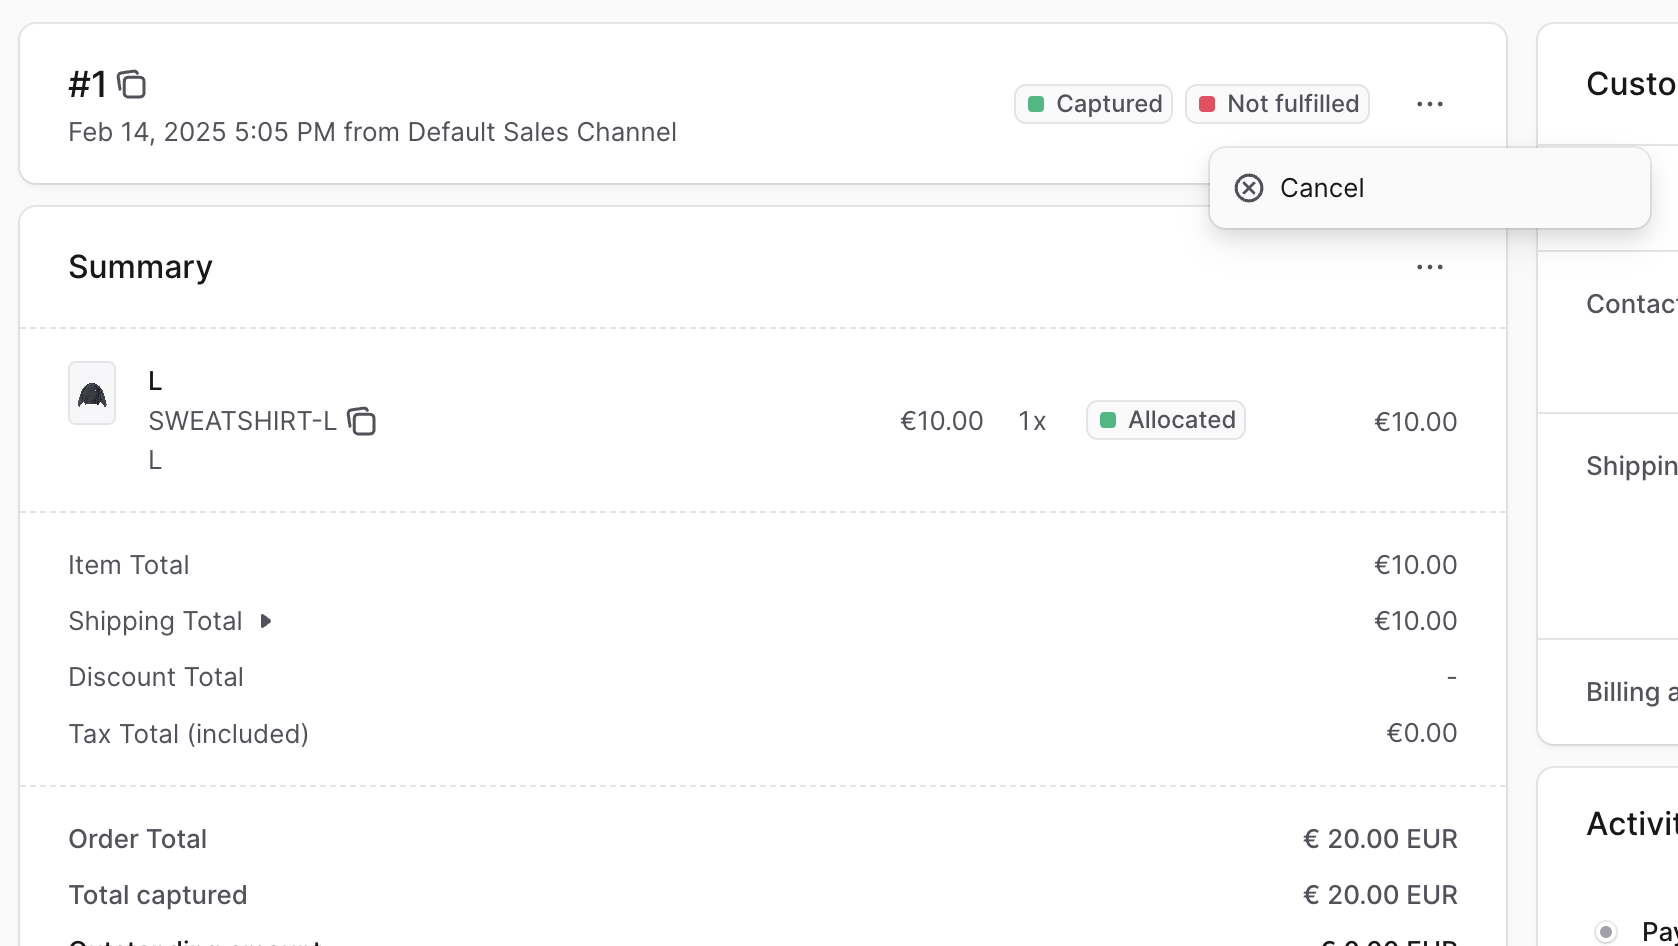
Cancel an Order
You can cancel an order if no actions have been performed on it, such as payment captured or items fulfilled. Canceling an order will change its status to canceled and notify the customer about the cancellation. Canceling an order is irreversible. To cancel an order:- Open the order details page.
- In the first section showing the order’s number, click on the
⋯at its right. - Click on Cancel from the dropdown.
- Confirm canceling the order by clicking the “Continue” button in the pop-up.
Key Features
BoxNCase order details management provides:- Comprehensive Order View: Complete overview of order status and history
- Customer Information: Full customer details with edit capabilities
- Order Timeline: Activity tracking for all order changes
- Payment Management: View and manage all payment-related activities
- Fulfillment Tracking: Monitor fulfillment progress and status
- Address Management: Edit shipping and billing addresses
- Customer Communication: Send notifications and manage customer contact
- Order Transfer: Transfer ownership between customers
- Manual Allocation: Handle inventory allocation when needed
- Order Cancellation: Cancel orders when appropriate
Order Status Overview
Order details show various status indicators:Payment Status
- Authorized: Payment approved but not captured
- Captured: Payment successfully processed
- Refunded: Payment returned to customer
- Partially Refunded: Some amount refunded
- Requires Action: Additional customer action needed
Fulfillment Status
- Not Fulfilled: No items have been processed
- Partially Fulfilled: Some items processed
- Fulfilled: All items ready for shipment
- Shipped: Items dispatched to customer
- Delivered: Customer received items
Order Status
- Pending: Order placed, awaiting processing
- Confirmed: Order confirmed and being processed
- Completed: Order fully processed and delivered
- Canceled: Order canceled before completion
Managing Customer Information
Editing Customer Details
You can update various customer information:- Shipping address: Modify delivery location
- Billing address: Update payment address
- Email address: Change notification recipient
- Contact information: Update phone numbers
Customer Communication
- Order notifications: Send updates about order status
- Custom messages: Communicate specific information
- Notification preferences: Manage how customers receive updates
- Contact history: Track all customer interactions
Transfer Ownership
Transfer orders between customers when:- Gift orders: Recipient wants to manage order
- Corporate orders: Transferring to appropriate department
- Address changes: Customer moved or changed details
- Account consolidation: Merging customer accounts
Order transfers require approval from the original customer and can only be transferred to registered customers, not guest accounts.
Order Activity Timeline
The Activity section provides:Automatic Tracking
- Order placement: When order was created
- Payment events: Authorizations, captures, refunds
- Fulfillment progress: Creation, shipping, delivery
- Inventory changes: Allocations and adjustments
- Status updates: All order status changes
Manual Entries
- Notes and comments: Internal team communications
- Customer interactions: Phone calls, emails, support tickets
- Special instructions: Custom handling requirements
- Issue tracking: Problems and their resolutions
Timeline Benefits
- Customer service: Quick understanding of order history
- Issue resolution: Track problems and solutions
- Audit trail: Complete record for compliance
- Performance analysis: Understand processing times
Advanced Order Management
Manual Inventory Allocation
Sometimes items need manual allocation: When Required:- Order editing added new items
- Inventory configuration changes
- Stock location modifications
- System integration issues
- Identify unallocated items (“Not allocated” badge)
- Choose appropriate stock location
- Specify quantities to allocate
- Confirm allocation
Order Cancellation Guidelines
Can Cancel When:- No payment has been captured
- No items have been fulfilled
- No shipments have been created
- Customer requests cancellation
- Payment already captured
- Items already fulfilled
- Shipments in progress
- Return/exchange in process
JSON Data Access
The JSON section provides:Developer Benefits
- Raw data access: Complete order data structure
- API integration: Understanding data format for integrations
- Debugging: Troubleshooting system issues
- Data analysis: Extracting specific information
Common Use Cases
- Custom reporting: Extract data for specialized reports
- Integration testing: Verify API data accuracy
- Troubleshooting: Investigate system behavior
- Data migration: Understanding data structure for migrations
Best Practices
Order Management
- Regular monitoring: Check order status and progress regularly
- Prompt updates: Update order information as situations change
- Clear communication: Keep customers informed of any changes
- Documentation: Maintain detailed notes for complex orders
- Team coordination: Ensure all team members understand order status
Customer Service
- Proactive communication: Reach out before customers need to ask
- Accurate information: Ensure all details are current and correct
- Quick response: Address customer inquiries promptly
- Follow-up: Check satisfaction after issue resolution
Data Management
- Regular backups: Maintain order data security
- Access controls: Limit order detail access appropriately
- Audit trails: Maintain complete activity records
- Data quality: Ensure information accuracy and completeness
Troubleshooting Common Issues
Address Update Problems
- Verify address format meets shipping requirements
- Check that shipping methods support new location
- Confirm address validation with shipping provider
- Ensure customer confirms address changes
Customer Transfer Issues
- Verify destination customer account exists and is registered
- Confirm original customer approval for transfer
- Check that transfer doesn’t conflict with order status
- Ensure payment methods remain valid
Allocation Problems
- Verify sufficient inventory at chosen location
- Check inventory management settings for variants
- Confirm location has proper configuration
- Ensure stock levels are accurate
Cancellation Restrictions
- Review payment status and capture state
- Check fulfillment progress and shipment status
- Verify no returns or exchanges are in progress
- Confirm all stakeholders agree to cancellation